Blogger Post Composer
We had discussed about how to create a blog in Google's blogger platform. Now we are going to see, how we will going to learn what are the facilities provided by blogger post composing editor. For navigating to Blogger editor, just click on the
New Post button provided in the blogger home page after logging in.
Overall look of the blogger editor is shown below
 |
| Blogger Editor |
So, now we are going to discuss about each and every element placed in that editor and how it is working.
1. Heading
This is a text box to define what should be the heading of your post. For an example heading of this blog post is
[How To] User Blogger Post Editor | Full Guide. Search engines will first prefer your post heading while users searching for something. So define your blog post heading before searching what keywords should be included. If you defined it properly, then your blog will be more visible in search engines.
2. Body
Body is a content editable div. Which means, you could see live as HTML viewer what you are composing. Example of body composing of this blog post is given below
 |
| Body Compose | Blogger |
You can see what are the details you have changed like text color, font size, font, images added, videos added etc in this compose mode. Also there are two compose modes like
Compose and
HTML, that can be seen on the top-left of the blogger composing screen look like
 HTML
HTML composing for those who knows HTML language. In HTML view, a text area will be displayed that contains full HTML of your composed post. If you want to edit your post and want more control over HTML, you could use this facility.
HTML editor is shown below
 |
| Blogger HTML Composer |
3. Post Styling Tools
Post styling tools are used to style your blog post by changing text font style, font size, specifying is it bold, italics or underline, coloring etc etc. There are lot of tools available in blogger. Summary of them are shown below
 |
| Blogger Editor Tools |
1. Font Selector
 |
| Font Select | Blogger |
Apply different font for posts by using this tool. To use this, one way is choose the font you want to apply for the particular post before composing. It will be applied all over the post by default. And if you want to apply for particular paragraph, just select the paragraph or text and click on the particular font you want to apply, its done. Some examples of font using in text is given below
- Arial font using
- Courier font using
- Georgia font using
- Helvetica font using
- Times font using
2. Font size change
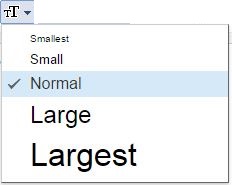
This tool will help you to manage the font size. Five types of font sizes are currently listed in this tool till now.
 |
| Font Size Change |
By default it is
Normal, and if you want to change just select the text you want to change and click on the corresponding font size. Some examples are given below
- Smallest
- Small
- Normal
- Large
- Largest
3. Heading chooser
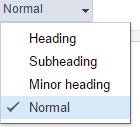
This tool will allow you to add H2, H3, H4 tags in your blog post. These tags will also helps you to increase your search engine visibility. So it is better using heading tags rather then the font sizes for heading.
 |
| Headings | Blogger |
By default it is
Normal, and if you want just select the text and apply by clicking on appropriate tag. Type of headings available in this tool is given below
- Heading (H2 tag)
- Subheading (H3 tag)
- Minor heading (H4 tag)
- Normal (P tag, it's paragraph)
4. Text Decoration
Decorate your texts by using bold, italics, underline and strike through tools. I think most of the people would aware of it.
 |
| Text Decoration | Blogger |
B for bold (Ctrl+B),
I for italics (Ctrl+I),
U for underline (Ctrl+U) and
ABC for strike though.
5. Text color decoration
 |
| Text Background Color | Blogger |
This tools will allow you to color background of your text. Just select the text you want to color and pick the color from the color picker.
This is a background colored text.
 |
| Text Color | Blogger |
To apply coloring for texts, you could get help of this tool.
This is an example of colored text.
6. Inserting Image/Video/Link/Special Symbols and Jump
 |
| Insert link/image/video | Blogger |
1. Insert Link In Blogger
For inserting a link, first select the text you want to convert it into link, then click on the
Link button, then a new window will pop up like below
 |
| Add Link | Blogger |
Your selected text will be shown in the
Text to display box and you should enter the URL in
Web address box. Email address can be also added by choosing the
Email address option.
Test this link button is placed to check whether the link is working or not. By clicking on
Test this link a new window will open with the URL. If you checked
Open this link in a new widow check box then while users clicking on that link from your blog post, it will open in a new window, which is helpful for the users to stay with your post and navigate to URL.
Add 'rel=nofollow' attribute, if this is enabled the link you have added in your post will not be followed by you. Which means it will not take as a back link in your blog.
2. Insert Image
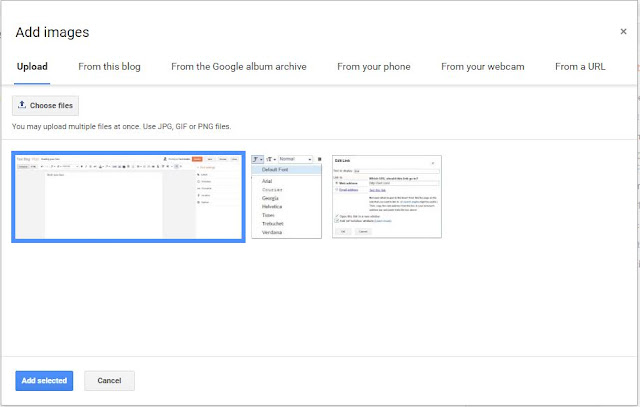
Click on the image button on the toolbar to insert images in your blog posting. A new window will open like below image
 |
| Browse Images and Upload to Blogger |
Click on the
Choose files button to select files from your PC. Files will be automatically uploaded after selecting and clicking on
Open button. You must select uploaded files to add it on your blog post. When selecting an image a blue border will see you there as shown in the example above and after clicking on
Add selected button, it will gets added. Uploaded images will saved into your Google Drive blogger album by default.
There are five other methods to insert images in blogger posts. One is
From this blog, by choosing this option your Google Drive images saved from this blog will be displayed, you can choose which image need to be inserted and add it.
 |
| Insert Image From this Blog | Blogger |
From the Google album archive option will display your albums on Google Drive and you can choose which photo from which album need to be chosen. Select the image and add it.
 |
| Add Images from the Google album archive | Blogger |
From you phone is an option to add images automatically backup from your mobile devices. If you are using an Android mobile you are familiar with the Google Photos application, it will automatically backup your phone images into Google Drive. That images can be inserted by using this method.
 |
| Insert image from your phone | Blogger |
From your webcam, as the name suggests your webcam is needed to add this image. A photo will taken real time by using your computer webcam and uploaded to Google Drive and that can be imported in your posts. But you must have a webcam to do so.
 |
| Upload images from your webcam | Blogger |
From a URL, option means your can attach images uploaded in other image hosting platforms and use the URL from their to add in your blog. Benefit of this method is, your Google Drive storage will be saved because the image file hold in different server. But the risk is yours, if the host provider ending up the service all your images will be lost.
 |
| Add images from a URL | Blogger |
3. Insert Video | Blogger
Click on the video image button to open the video add screen. By default it will look like below image
 |
| Video upload | Blogger |
Choose a video to upload button helps to choose and upload videos in blogger and the videos will be uploaded to Google drive. Attached in your posts like below image
 |
| Uploaded video display in blogger |
Also you could embed YouTube videos in blogger by choosing
From YouTube and
My YouTube videos options. Videos will be listed like below image and select one video, click on the
Select button to embed it on your blog post.
From YouTube option will displays all videos from YouTube, you can search and add them.
My YouTube videos option will only list your uploaded YouTube videos.
 |
| Embed YouTube Videos | Blogger |
Also like in image insert,
From your phone option is also available in video embedding option. It is working as like we had discussed in the case of image insert in blogger.
4. Insert Special Characters Blogger
To insert special characters on blogger click on the smiley icon. There are thousand of symbols are available in the directory. For example smileys, arrows, modifier etc. After clicking on the icon a new window will pop up like below image
 |
| Insert Special Characters | Blogger |
Point the cursor to the required position and click on the special character you want to add. For example some smileys are added, and following 😅😆😇😊😍. Just try yourself. You can also search. Enter the criteria in the search box and press Enter key.
5. Insert Jump Break in Blogger
What you mean by a jump break? It is a separator between something you want to separate. Place the cursor to the right position you want to add a break (may be an end of the paragraph) and click on the broken image. An example is shown below
Text before break
Text after break.
7. Manage Alignment | Bullets | Numbering Blogger
Now we are going to see about the section of alignment of text, bullets, numbering, quoted text and remove all formatting.

1. Alignment
 |
| Alignment | Blogger |
Four type of alignment options are available in blogger, as like in the Word application. Left, center, right and justify. It will work as like the Word options. I think you must posses some what idea about text alignment.
To apply alignment, select the paragraph or texts you want to align, the select the appropriate alignment from the selector. By default it is left alignment.
2. Numbering
By clicking on the numbered list, automatically a numbering is applied. It is also working like the Word option numbering, If you want to include numbering anywhere in your blog post, just place the cursor and click on the numbered list button, automatically 1 will be placed. An example is given below
- One
- Two
- Three
Double entering stops the numbering and the last added number will automatically removed.
3. Bullets
Same as numbering, difference is bullets is shown rather than numbers. An example is given below
- First bullet
- Second bullet
- Third bullet
4. Quoted Text
This is an example of quoted text
This facility is used to highlight text. Just select the text you want to quote and then click on the Quote button, text will be quoted.
5. Remove formatting
Select a stylized text and click on the remove formatting button, all style will be removed (anything like color, back color, bold, italics, link etc).
8. Miscellaneous Tools
1. Text direction
These to option define the cursor running position in blogger posts. First one for left-to-right direction and in blogger it is default. Second one is right-to-left, for starting writing text from right to left. An example is given below
Right direction text
Left direction text
2. Write in other languages blogger
First tool is for check spelling and the second two options to write in other languages. Lots of languages are available for writing blog posts. Main advantage is that, you could write in your blog in your favorite language. You just need to type in English, Google algorithm will convert it into the activated language. It will work only if the option is activated otherwise English will be the language.
3. Undo/Redo
First one in undo and the second one is redo, Most of the people knows what does it means. So I'm not explaining that tools here.
4. Post Settings
Post settings section contains labels, schedule, permalink, location, search description and options. We are going to see one by one.
1. Labels
 |
| Labels | Blogger |
These are meta tags used for more search engine visibility for your posts and blog. Labels must be related to your blog post, and search engine also searches in post tags. Don't use larger texts in tags, user short texts of two words or one word like as shown in the above example and separated by commas.
Write tags and press enter to automatically add commas into it.
2. Schedule
 |
| Schedule Blogger Posts |
You could schedule your draft post to publish for specific date and time by using this post settings. Choose the date from the calendar and enter the time in 24 hours in the time box (or choose from the drop down box, some default times are there). Default time format is Pacific Daylight Time and you can't change that from here.
3. Permalink
 |
| Permalink customize | Blogger |
This is the link indexed in search engines to your blog posts. Automatically they (blogger) will generate a custom link, you can edit that link by clicking on the
Custom Permalink option. You should write your link as SEO optimized. Remember that, this is also a search criteria in search engines search. Use best keywords in permalink to get more traffic to your post. Don't use space in your permalink because it is not allowed.
4. Location
 |
| Location set for Post | Blogger |
You can set custom location for your blog posts. You can either search in the box or choose from the map shown. Location will set which region users should reach to the post. So by setting this search engines will this result relevant to that particular region. You could user
Remove link button to remove if you added a location by accident.
5. Search Description
 |
| Search description | Blogger |
This is also search engine indexed description for your blog post. It is called met description. You could see this description under the search link in the searching page. Use your best keywords to get more visibility in the search description. Search engines also searches in the meta description while indexing results. So be brave.
6. Options
 |
| Options Blogger Posts |
Reader comments means allow readers to post comment on the corresponding post, if you don't want to be users to be commented on your posts check the
Don't allow option. Then comment box will be disappeared. Other options are for the editor and configuration, just leave like it behind.


![[How To] Use Blogger Post Editor | Full Guide](https://blogger.googleusercontent.com/img/b/R29vZ2xl/AVvXsEiVAqU4Y1O3mTNDz698koxgeQVMj5prA9Odw3P9bJUhG_prEpDiORHKNInKEGwldju7xYBy4oRB1dnXtRrFzpzQB73iCrNUuAoIFqC6_CNleix1y88aqmDX8YjwyVapDIrEKIrpAUCUbkWP/s72-c/%255BTechDoubts.Net%255D+Blogger+Compose+Page.JPG) Reviewed by TechDoubts
on
7:42 PM
Rating:
Reviewed by TechDoubts
on
7:42 PM
Rating:


![[Solved] SP Flash Tool is not detecting or starting download](https://blogger.googleusercontent.com/img/b/R29vZ2xl/AVvXsEhnMU_Ls-1o44dxRdFLHd4pKzy_nC29G29RJh3ikESEfal_wH4yUXNK5CzpQdsdJPtQTtsHQppZW6xPeG73V6VcFy_v8VXDi1tztdkBQv4LvQDnRBNZxdEgiM2pnmtjbgO7UFsQhu0GkliR/s72-c/%255BTechdoubts.Net%255DSp-Flash-Tool-Device-Not-Detecting-Problem-Solved.JPG)
![[Working] Windows Service Task Scheduler c#](https://blogger.googleusercontent.com/img/b/R29vZ2xl/AVvXsEhBlLPboKe86xfA9jMaET0WihCAykDvwO1dwcU4rTCo2k2ttALdyhnymHGTBR6fG_iqQIqxNKBnLbbRSiib7tzZ4q38EV4wIXh-yDczO_giI2ID2U7SSaBE35jA6doWb59QkfxCTidQ6H2k/s72-c/%255BTechDoubts.Net%255DSimple+Scheduler.png)
![[How To] Send email using Lotus Server asp.net c#](https://blogger.googleusercontent.com/img/b/R29vZ2xl/AVvXsEizVWEXqHIk3lL6gKKkcmeS9u4xd6v-w0lYljInYxH8Cln7m_6XuFXY-UGnV2yhtBLrJS4S8BRxMS97-OTL4e9ymJ4jwEf-WSmPlUkpCELhRUlHkTgfZmF-JfMCDuuCD2e4ebZuXBp2vEpr/s72-c/%255BTechDoubts.Net%255DDLL+Needed+for+Lotus+Server+Mailing.JPG)
![[Working] jQGrid Responsive CSS Boostrap Design Full Rearranged](https://blogger.googleusercontent.com/img/b/R29vZ2xl/AVvXsEja154pMPyCqu4b3Ax_3YHIms41Onp3Q-ndkdkbAAjBdpMT6y-kCRQSwPvs5HsDCZblLIcimjACMtJYxTPHUNeA16a9sdYalHZw3d0Gc3Rv6MLZ3nVTy86-zuMo2yJc_6QM1Pc-IQSf4hM/s72-c/jQGrid+Responsive.png)
![[Resolved] jQGrid Inline Edit | Dropdown | Combobox| Select Bind Dynamically](https://blogger.googleusercontent.com/img/b/R29vZ2xl/AVvXsEiiisyJRolBsD-T9jkpzoaYYCt2ro_4uP3QVJAKdmg9SDAq-8V1KHgwxpr2wkRcKLFiIFEjjscR7hwXB_HYAHPglkA5WSR9qd0QnIMVsXINhM6pVHBVN-IydW6bMPDHyIycUxaYEVhDkCg/s72-c/jQgrid+Country+Bind.png)

No comments: